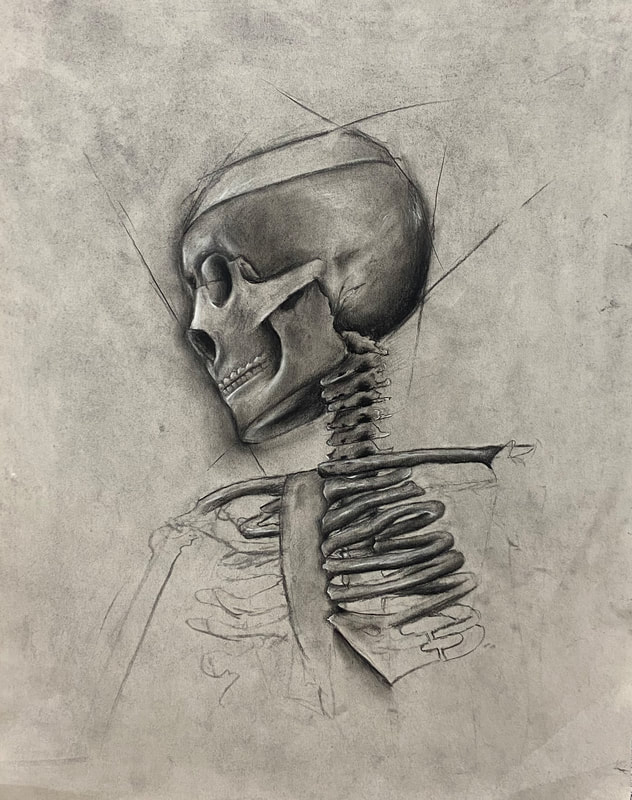
Title - Anatomy Skeleton Size - 36" by 24" Medium - Vine charcoal layered with compressed Date - August 2021
E X H I B I T I O N T E X T
For me, practicing life drawings in charcoal was a beneficial practice. Typically, my work is well planned with detail and precision, however, charcoal requires a large picture, more "messy" approach. Originally I thought this was going to be something that would hold me back, however, I did not feel that this was the case at all. I thoroughly enjoyed being able to capture the intense depth of shadows and bring contrast to the white of each highlight. The messy nature of charcoal made a blank piece of paper much more approachable which was contrary to my original expectations. After coating my paper in a thin layer of charcoal, I felt I had taken away the need for constant perfection. The messy, sketched and blured lines quickly formed detailed drawings and the piece became something I was proud of.
P R O C E S S
S T A G E O N E
I first began by sketching out a basic outline. The goal was to capture the general form of the figure I planned to later draw in more depth. For this step we utilized vine charcoal, a softer more forgiving alternative to compressed charcoal. It allows you to sketch fairly freely as it is simple to erase with the smudge of a finger. However, it does have it's draw backs. Vine charcoal is very hard to layer and creates a consistent midtone shade regardless of how much you layer it. Also, although in preliminary sketches an easy to erase medium is ideal, it can be problematic for more complete stages. It's easy to erase characteristics can provide a frustating drawback as you attempt for a more concrete drawing. Once I got to this point in the sketch I decided to move on to adding shaddow before completing the rest of my outline. This is something that would later be a source of problem as the complete piece was not sketched consistently.
S T A G E T W O
During this stage in the process the goal was to begin to darken the previously established vine charcoal shadows using compressed charcoal. Compressed charcoal offers a deep rich color, however, it has to be used with more confidence as it is difficult to remove. One of my biggest struggles with this project was my inability to complete a full stage before progressing to the next, which at the time I did not realize would be an issue. Once I started to add more depth to the shadows I lightly created with vine charcoal, I quickly ran into unclear sketches. The ribcage that I decided not to sketch in detail was unable to be shaded using compressed charcoal as I needed to know exactly where to place it (due to compressed charcoals more concrete characteristics). To fix this issue, I simply went back in with vine charcoal and sketched in some of the sections I needed. I didn't have enough time to progress through the whole sketch as we were on a timer, but at least at this point I had more to work with.
E X T R A N O T E
Because I had relied so strongly on the vine charcoal in the beginning stages, a large portion of my piece was not actually set in its place. After leaving it overnight, it looked faded and smudged and part of my work was lost. At this point I learned that it would be important to make sure to incorporate more compressed charcoal to ensure my piece would stay put.
S T A G E T H R E E
At this point, I worked to further the level of detail in the face. Using compressed charcoal instead of vine charcoal, I was able to reach a significantly higher degree of shadow. This also allowed me to get a slightly more permanent sketch as compressed charcoal is a lot harder to smduge away. In my previous step I had noticed that the drawing looked very out of place- as if it had just been stuck on the page. So, to fix this, I worked to add a faded shadow that seemed to glow off of the left side of the figure. I found this to make the skeleton significantly more natural on the piece of newsprint. During this step I also worked to add detail into the spine using compressed charcoal. Using vine chacoal I went in an added extra detail to the rib cage to begin shading in future stages.
S T A G E F O U R
For the final stage in my process, I filled in the ribcage and added extra shading to the rest of the figure. In addition to this, I experimented with using white charcoal and erasing to add in highlights. This added a large amount of contrast and depth to the drawing.
I then added in final details and fixed any rough edges, completing the piece.